Thursday, August 25, 2022

Cheater Bulgogi Beef

You can make bulgogi sauce from scratch, but instead I just bought jars from the local asian market. Tried one and the DBD really liked it, so going to add this into the dinner rotation.

  • 90 g bulgogi sauce
  • ~1 lb beef (rundreepjes, thinly sliced steak, other)
  • oil
  • vegetables (sprouts, mushrooms, gailan, carrots, etc)
  • rice/noodles
  1. Marinate the beef for 3 hours to overnight, covered in the fridge.
  2. Heat oil in pan and cook beef until cooked through (~2 min each side).
  3. Remove to serving dish.
  4. Saute vegetables in saucy pan.
  5. Serve with rice or noodles.

Wednesday, August 24, 2022

Single Layer Cake with Fruit

MM doesn't like too cake that much so made a single layer birthday cake. This is easy to do with fresh or frozen fruit. I used frozen peach slices. XBD said there should have been more fruit. There was only a small amount of leftovers that was finished the next day.

  • 8 T (113 g) butter, room temp
  • 3/4 c sugar
  • 1 t baking powder
  • 1/2 t salt
  • 2 eggs, room temp
  • 1 t vanilla
  • optional: 1/4 t almond extract
  • 1 c flour (or mix of almond meal)
  • 1.5-2 c fresh or frozen berries/stone fruit (sliced)
  • 2 T - 1/4 c sugar (depends on tartness of fruit)
  • 1 t cinnamon
  • whipped cream (slagroom/heavy cream 30-36% fat, sugar, vanilla)
  1. Preheat oven to 350F. Grease 8-9" square pan or 9-10" round pan
  2. Beat together the butter, sugar, powder, and salt until smooth.
  3. Beat in eggs, one at a time, scraping the bowl each time.
  4. Stir in extract(s).
  5. Mix in flour to make a stiff smooth batter.
  6. Spread the butter in the greased pan.
  7. Add the fruit and bake.
    1. If using fresh berries, sprinkle on top of batter and sprinkle with sugar and cinnamon. Bake for 35-40 min.
    2. If using frozen fruit, bake the cake batter for 10 min (to set the bottom of the cake). Remove from the oven, sprinkle the fruit evenly, and top with sugar and cinnamon. Continue baking for 40-45 min.
  8. Remove when light golden brown. Cool slightly. Serve with whipped cream.

Sunday, August 14, 2022

Sunshine Wreath aka Citrus Twist

This is my favorite recipe so far from Samantha Seneviratne's cookbook, Joys of Baking. Its warm yellow spiral design and wonderful fragrance can't help but bring a smile to my face.

The first few times I made it, I did it by hand. Truly a labor and I couldn't help add a bunch of flour because it was so gloppy after adding the butter. Now that I have a stand mixer, it's so easy to just let the machine do the work and the butter eventually gets worked in without having to add more flour (or feeling like I'm going to injure my arm from the intense kneading). I even made 2 doughs in the same day (saving one to bake a couple days later).

DBD watched the video on how to make it and caught that you can use the spread on toast as well, and  made sure to save some the last time we made it (in fact, DBD and XBD made the filling together while I lay on the couch). 

8/22/23 Made this for a summer gathering. Still a personal favorite.


Tuesday, July 26, 2022

Japchae

I've missed jap chae so much since leaving Seattle. Combined with not being able to eat onions and peppers, it's high time I made it myself. I bought a package of the Korean japche noodles in Canada, and then gave it away when leaving the country. I've found some here in the asian market and finally got around to making it. Delicious. Original recipe was for 4 oz noodles, but that was not enough. Neither was just 1 egg yolk.
Jan '23 Made this with GG and having her chop half the veggies made this go so much faster. Didn't have any scallions.
1/9/24 Had no garlic left, still tasted great. 4 eggs but XBD said it still wasn't enough.

  • 4-8 oz chapchae noodles (sweet potato starch noodles)
  • ~4 oz beef (filet mignon or pork shoulder, cut into strips
  • 2 shiitake mushrooms, rehydrated
  • carrot, cut into matchsticks
  • eggs
  • 2 cloves garlic, minced
  • scallions, cut into 2 inch long pieces
  • 4-5 white mushrooms
  • spinach
  • salt + pepper
  • soy sauce
  • sugar
  • sesame oil
  • sesame seeds

  1. Put the beef and shiitakes in a bowl with 1 clove garlic, 1 t sugar, 1/4 t pepper, 2 t soy sauce, 1 t sesame oil. Cover and refrigerate.
  2. Prepare the egg strips.
    1. For traditional yellow egg. Beat egg yolks (without the white stringy stuff) with some salt. Heat the pan and add 1 t oil. Wipe off excess oil so only a thin layer remains. Add the egg and turn off the heat (this keeps the egg as yellow as possible). Tilt to spread to thin layer. Cook for about 1 min and then flip and let it sit for another minute. Let it cool and slice it into thin strips. 
    2. For whole eggs (if you have no use for egg whites), beat the whole egg and make flat eggs (chinese fried rice style). Cut into strips. 
  3. Bring large pot of water to boil. 
    1. Blanch the spinach for 30-60 seconds. Rinse the spinach in cold water, squeeze out the water. Chop. Put in large bowl and mix with 1 t soy and 1 t sesame.
    2. Cook noodles, stirring for 1 min. Cover and cook for another 7 min until they are soft and chewy. Strain and cut them a few times with scissors. Add noodles next to spinach. Add 2 t sesame, 1 t soy, 1 t sugar (per 4 oz noodles).  Mix noodles well to season and keep from sticking.
  4. Heat skillet over medium high heat. Add 2 t oil and saute green onions with salt for 2 min. Transfer to noodle bowl.
  5. Heat skillet with 2 t oil and cook white mushrooms with a pince of salt, about 2 min until softened and juicy. Transfer to noodle bowl.
  6. Heat skillet with 1 t oil. Add carrot and stir fry 40 seconds. Transfer to noodle bowl.
  7. Heat skillet with 2 t oil. Add beef mixture and cook until no longer pink. Transfer to noodle bowl.
  8. Add 1 garlic clove, 1 T soy, 1 T sugar, 1/2 t pepper and 2 t sesame oil to the noodle bowl and mix together. Add the egg garnish and 1 T sesame seeds.

Tuesday, June 21, 2022

Waffle Machine Treats

MM got a panini machine with extra inserts 2 weeks ago. I've been busy making UFE (unidentified flying eyeball), egg bubble waffles, waffle shells, fusion taiyaki...these are some of the names we've given to the various creations. I've been using the flat ball insert and the shell shaped one to make various waffle creations reminiscent of NYC egg waffles. The grill I have is a much larger ball, and flatter. The device does not flip. The cooking time is only 65-90 seconds, but it's time consuming to fill each crevice precisely. I've found using the shells is easier, and can easily be filled like a Japanese taiyaki. They take 3 minutes to cook.

Essentially any waffle/pancake recipe can be used. For the taiyaki like ones a thinner batter is better so the filling can be covered quickly. I don't use vanilla since it ends up tasting like a fortune cookie (see old mjwaffle recipes for experimentation).

Batter 1 - Regular

I made as listed and also substituted coconut milk and egg whites. Cut in half easily for smaller batch size. Makes about 80 balls or 8 shells.

  • 200 g flour (all purpose or glutinous rice)
  • 8 g baking powder
  • 80 g sugar
  • 2 eggs
  • 140 ml milk
  • 20 g melted butter
  • optional: one chocolate chunk per ball

Batter 2 - Chocolate Delight

This is a thick batter but makes a deliciously rich dessert ball. Microwave the cocoa and butter until melted. Stir and add rest of ingredients one at a time. Makes 44 balls. (I also experimented with adding flour/milk/baking powder, but the original recipe is best).
  • 45 g cocoa powder
  • 80 g butter
  • 40 g sugar
  • 2 eggs
  • 40 g flour (all purpose or glutinous rice)

Batter 3 - Egg White only

I had leftover whites from making empanada dough so wanted to try an explicit egg white recipe. This came out very soft. It made 6 shells (5 filled, 1 plain).
  • 1 c flour (150 g)
  • 25 g sugar
  • 1/2 t baking powder
  • 1/4 t baking soda
  • 1/4 t salt
  • 3/4 c milk + 1.5 T lemon juice, sit for 5 min (or buttermilk)
  • 1/8 c butter (healthy slab)
  • 2 egg whites

Filling Options

  • chocolate chunk (kids love this in the ball, but I prefer them plain because they remind me of NYC days)
  • banana slices + chocolate chunks (this was loved by all, in the shells)
  • jam: cherry, raspberry, strawberry (XBD preferred cherry over raspberry)
  • raisins
  • red bean paste
  • custard
  • chocolate cream

Chinese Style Shrimp and Snap Peas

The traditional dish is shrimp with snow peas but we have an abundance of snap peas growing in the garden and they make a fine substitute. I found this incredibly delicious but the kids were not keen on it (nor did they refuse to eat it). It's important to prep all the ingredients while marinating so they can be added quickly to the pan.

  • 450 g/1 lb shrimp, deveined, shells removed
  • 2 t cornstarch
  • 1/2 t salt
  • 1 T shaoxing wine
  • big bowl of fresh snap peas (or snow peas)
  • 1 T ginger, minced
  • 3 cl garlic, sliced
  • 2 T high heat oil
  • 1/4 c chicken broth
  • 2 t soy sauce
  • 1 small stalk green onion, big pieces if not eating, small if eating
  • 2 t sesame oil
  • optional: white pepper, water chestnuts
  1. In a medium container, combine cornstarch, salt and shaoxing wine. Add shrimp. Stir. Let marinate for 15-20 minutes.
  2. While marinating, prepare the ginger, garlic, peas and green onion.
  3. Use high heat to preheat pan for 1 minute. Add oil and heat another 30 seconds.
  4. Add the garlic and ginger and stir for 30 seconds.
  5. Add the shrimp with all the marinade, peas, broth and soy sauce. Stir for 2 minutes.
  6. Add the green onion and stir another minute.
  7. Remove from heat and drizzle with sesame oil.
  8. Serve over rice.

Sunday, February 13, 2022

Cong You Mian

HM made this for us and it was beyond delicious. I wanted to try my hand at it but it did not come out nearly as well, so I will have to play with it. I used olive oil instead of cooking oil and the noodles were from Amazing Oriental and weren't just flour and water (they had sugar and other ingredients in them). The cong were very big (how does that change the flavor?). Or perhaps I didn't use enough noodles, as they came out very dark. The cong you (scallion oil) flavor was not as strong in mine - perhaps I didn't cook them long enough.

  • 4 T cooking oil
  • 5 stalks scallions, cut into long sections (about 50 g)
  • 2 T soy sauce
  • 2 T dark soy sauce
  • 2 t sugar
  • 400 g dried thin, round noodles
  1. Pour oil in wok. Add white parts of scallions. Simmer over medium low heat until they wrinkle. Add the green part. Continue to cook until they turn brown, about 10 min. Remove scallions.
  2. Add soy sauces and sugar. Cook until the sauce starts to bubble. Remove from heat.
  3. Cook the noodles. Drain and rinse briefly. 
  4. Put noodles in oil and stir to evenly coat. 
  5. Portion out to 4 serving bowls. Top with the fried spring onion and optional cooked vegetables.  

Tuesday, February 8, 2022

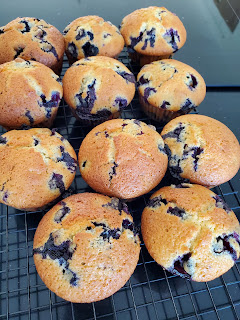
Blueberry Almond Muffins

The hint of almond and the sheer number of blueberries are what make these muffins special. Best warm out of the oven.

  • 2 c flour
  • 2 t baking powder
  • 3/4 t salt
  • 1/2 c butter, softened (113 g, or less if using Dutch butter)
  • 1 c sugar
  • 2 eggs
  • 1.5 t vanilla
  • 1/4 t almond extract
  • 1/2 c milk
  • 2.25 c fresh blueberries, washed and dried
  1. In a medium bowl, combine the flour, powder and salt.
  2. In a large bowl, beat the butter and sugar for 2 min.
  3. Add eggs one at a time.
  4. Stir in the extracts.
  5. Alternate adding the flour mixture and milk to make a thick batter.
  6. Gently fold in the blueberries. Do not overmix.
  7. Scoop into paper liners in muffin tin.
  8. Bake at 375/190 for 30 min until lightly golden.
  9. Cool in pan 10 min.
  10. Run knife around edge to remove from muffin tin and cool on wire rack.


Wednesday, February 2, 2022

Soft Coconut Cookies

It's impossible to find semisweet chocolate here so instead of making chocolate chip cookies, I tried a new recipe for soft coconut cookies. I used to make macaroons when I was younger but find them too sweet now. This one was a nice touch of coconut without being overwhelmingly sweet nor chewy. I baked them 3 trays for different lengths and lightly browned looks the best. Made 39 cookies.
To try: One reviewer suggested using just 1 c sugar (instead of both sugars) and juice+zest of one lime.

  • 2.5 c coconut (2 c for toasting, 1/2 c plain)
  • 2.5 c flour (used 2 c Dutch bread flour, 1/2 c German flour)
  • 1 t baking soda
  • 3/4 t salt
  • 185 g butter, room temp (original was 225 g/1 c, but Dutch butter is weird, so reduced it)
  • scant 3/4 c brown sugar (mostly donkere, but with a touch of light)
  • 3/4 c sugar (Dutch fine)
  • 2 eggs
  • 1.5-2 t vanilla
  1. Spread 2 cups of coconut in pan over induction heat 5, stirring constantly until golden brown. Be careful not to burn. Immediately transfer to bowl to cool.
  2. In a medium bowl, combine flour, soda and salt.
  3. In large bowl, beat the butter and sugars for 3 minutes.
  4. Beat in eggs, one at a time.
  5. Stir in vanilla.
  6. Add flour mixture until just combined.
  7. Add toasted coconut and mix until just combined. Do not overmix.
  8. Place plain coconut in bowl (can be chopped up further). Roll dough into small balls and dip one side in coconut.
  9. Place on parchment lined cookie sheet. 
  10. Press down cookies since they will not spread very much in oven (thus, there is no need to refrigerate the dough either). 
  11. Bake for 9-12 min at 175-180C until just beginning to brown at edges (or slightly less). 
  12. Cool on wire rack.
  13. Store in airtight container.

Wednesday, January 26, 2022

Brown Eggs

I grew up helping my mom peel eggs to make this dish but I never paid attention to how she made the broth. Even as an adult she would make it for me when she visited. Because of the pandemic visits have come to a halt. So since I made beef shanks I used the broth to make the eggs for the first time in my life. Now that the BDs like hard boiled eggs, they enjoy these too.
Jan '23 XBD loves this dish.

  1. Add eggs to pot in single layer. Add cold water
    1. Gas stove: bring to boil
    2. Induction stove: use power mode to bring to boil and then continue to boil at reduced heat for 3 min
  2. Cover pot and turn off heat. Wait 7 minutes (up to 9 for gas stove, and depending on size of eggs).
  3. Immediately drain to prevent further cooking (which leads to stinky, green layer on yolk) and run cold tap water over the eggs. Let cool in cold water bath (optionally with ice cubes).
  4. Once cooled, peel the eggs. Place each egg in broth.
  5. Soak overnight in fridge. They will get darker and soak up more broth the longer they sit.
  6. Enjoy as snack, sliced or as accompaniment to a noodle soup or rice dish.

White Pickled Daikon

This is a quick pickle of daikon that leaves it white, NOT the luo buo gan recipe that leaves it brown and takes longer to make. I tried a random recipe and it had sugar-vinegar ratio opposite to what I expected. So it came out very sweet. I think it could be adjusted to tone down the sugar and increase the tartness. But it was very easy to make - crunchy and delicious.

  • 1/2 large daikon, peeled (~500 g) 
  • 1/2 c sugar (try reducing this next time)
  • 1 T salt
  • 1 T vinegar (try increasing this next time)
  1. Cut the daikon in quarters lengthwise. Then slice to desired thickness.
  2. Place in a large ziploc and add the remaining ingredients.
  3. Massage for a few minutes.
  4. Transfer to airtight container, like a leftover pasta sauce jar. Keep in fridge for 24 hours minimum. Flavor will continue to develop the longer it sits.

Tuesday, January 25, 2022

Beef Shank Noodle Soup

This dish came out delicious and even DBD liked the soup broth. I substituted garlic for onion.
6/11/22 Made this again, this time with MM, delicious as ever.

  • 1 T oil
  • 1 carrot, sliced
  • 1 garlic, minced
  • 1.5 c water
  • 1 c beef braising liquid from shank recipe
  • 2 T ketchup
  • 3-4 servings of wheat noodles (ramen, udon, etc)
  • broccoli pieces (or Chinese greens)
  • braised beef shank, chopped
  • salt
  • optional: white pepper, pickled radish, chili oil, cilantro
  1. Heat oil in pot over medium-high heat. Cook the carrot for 2 min. Add the garlic. Stir to prevent burning and cook another minute.
  2. Add the water, braising liquid, and ketchup. Simmer for 10 min
  3. In a separate pot, cook the noodles. When done, rinse with cold water and place into serving bowls.
  4. Cook the greens in the same pot for about 1-4 minutes (to desired consistency). Place greens in serving bowls.
  5. If the shank is cold, add it to the broth to warm it up for minute.
  6. Taste the broth. Add salt and white pepper as needed. Pour into the noodle bowls and add beef pieces and optional toppings.

Stovetop Braised Beef Shank - Jiang Niu Rou

MM found 3 beef shanks at the local grocery store and put me in charge of cooking them. My dad showed me how to braise them Chinese style years ago but I never tried and forgot the details (except about blanching the meat and skimming the water). This recipe skipped the draining part. It turned out delicious - the whole family loved it. And I used the leftover broth to make a beef noodle soup, brown eggs, and enjoying plain.
6/11/22 Made this again and when it was time to eat the meat was still a bit tough. We let the rest sit on the stove to cook another 1 or 2 hours and then it was perfectly soft. This time had the peppercorns and shaoxing wine. Used 5 shanks and increased ratio of ingredients accordingly.
Jan '23 Blanched the beef first and drained before cooking with all the flavors in fresh water. This made skimming it easier. Also used new brand of soybean paste.
Feb '23 Blanched first again. Should try blanching with wine next time.

  • 3 beef shanks (next time try more to have more leftovers?)
  • 2 T Shaoxing wine (I didn't have this so used sake instead)
  • 4 green onions, cut into 2" long pieces
  • 1 thumb ginger, sliced
  • 1 t Sichuan peppercorns (also did not have this)
  • 2 T fermented yellow soybean paste (I used fermented, but maybe not yellow)
  • 2 T light soy sauce
  • 2 T dark soy sauce
  • 3 bay leaves
  • 3 cloves (I couldn't find the whole cloves so added a dash of ground cloves)
  • 2 star anise
  • 1 cinnamon stick
  • 1/4 t nutmeg
  • dash of cardamom (original asked for 1 black cardamom, optional)
  • 1 T sugar
  • 1 t salt
  1. Blanch the beef: Add the shanks into a pot. Add 4 cups of cold water to cover the beef. Add the onions, ginger, peppercorns and Shaoxing wine. Cook over medium-high heat until it boils. Turn down to medium. Boil for 10 min and skim the foam off regularly.
  2. Make the paste: Combine the soybean paste and soy sauces in a bowl. Mix until dissolved into a smooth sauce.
  3. Add the paste to the shank pot, along with the rest of the ingredients. Cook over medium-high heat until it simmers. Turn to medium-low and simmer, covered, for 2 hours (until meat is tender). (Range can be 1.5-2.5 hours depending if you want it to fall apart or not).
  4. The beef is ready to eat. Store leftover meat and broth in covered container in fridge. Use beef to eat plain (sliced thin, cold), as addition to beef noodle soup, or on top of rice. Use broth to cook vegetables, make a soup, or flavor rice.